Method 1: AI-Powered Website Building
Harness AI for rapid prototyping. Ideal for idea validation or non-coders. We'll use Mimo + ChatGPT for a cat-themed site.
Step 1: Set Up Mimo Account
Download the Mimo app (iOS/Android) or visit mimo.org. Sign up free with email/Google. Verify via email for full access to Build mode.
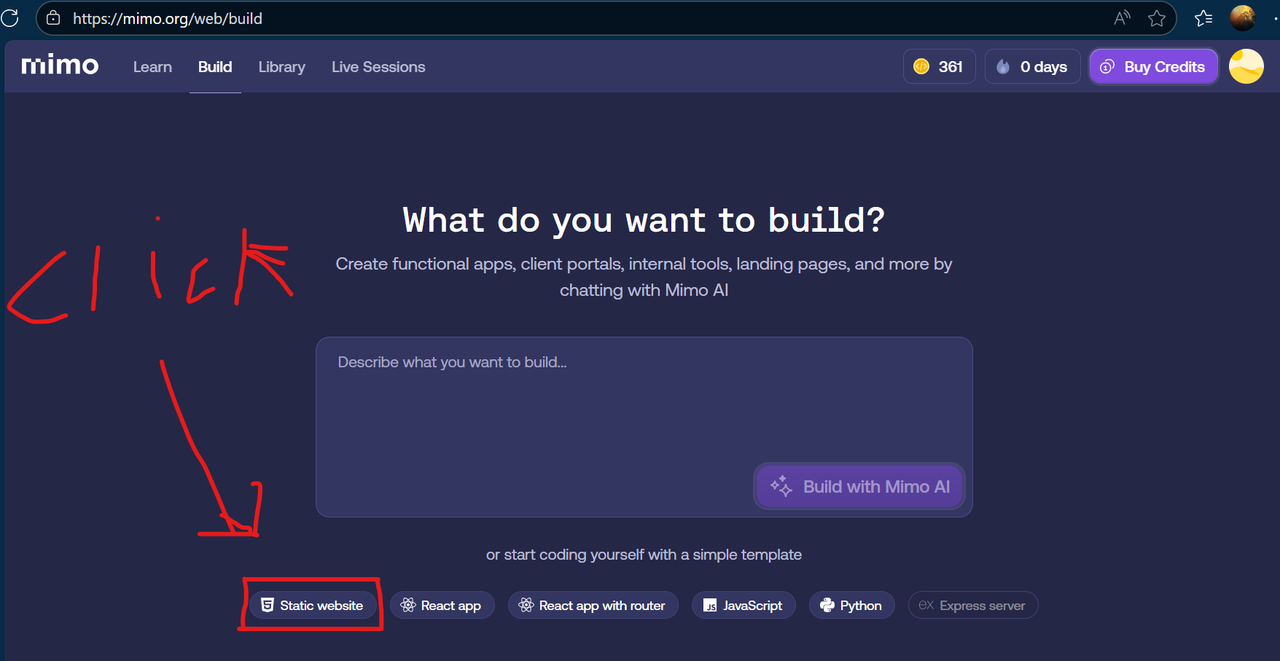
Step 2: Launch Build Workspace
Tap Build tab > Select AI Web Creator > Choose Static Website. This opens a live editor with preview pane.
Step 3: Craft AI Prompts in ChatGPT
Open ChatGPT (free tier works). Use iterative prompts for best results:
- Base: “Generate a responsive single-file HTML/CSS/JS site about funny cats, with hero section, gallery, and theme toggle.”
- Refine: “Add smooth animations to images and a contact form that emails via Formspree.”
- Polish: “Optimize for mobile, add SEO meta tags, and ensure accessibility (ARIA labels).”
<!DOCTYPE html> to </html>.
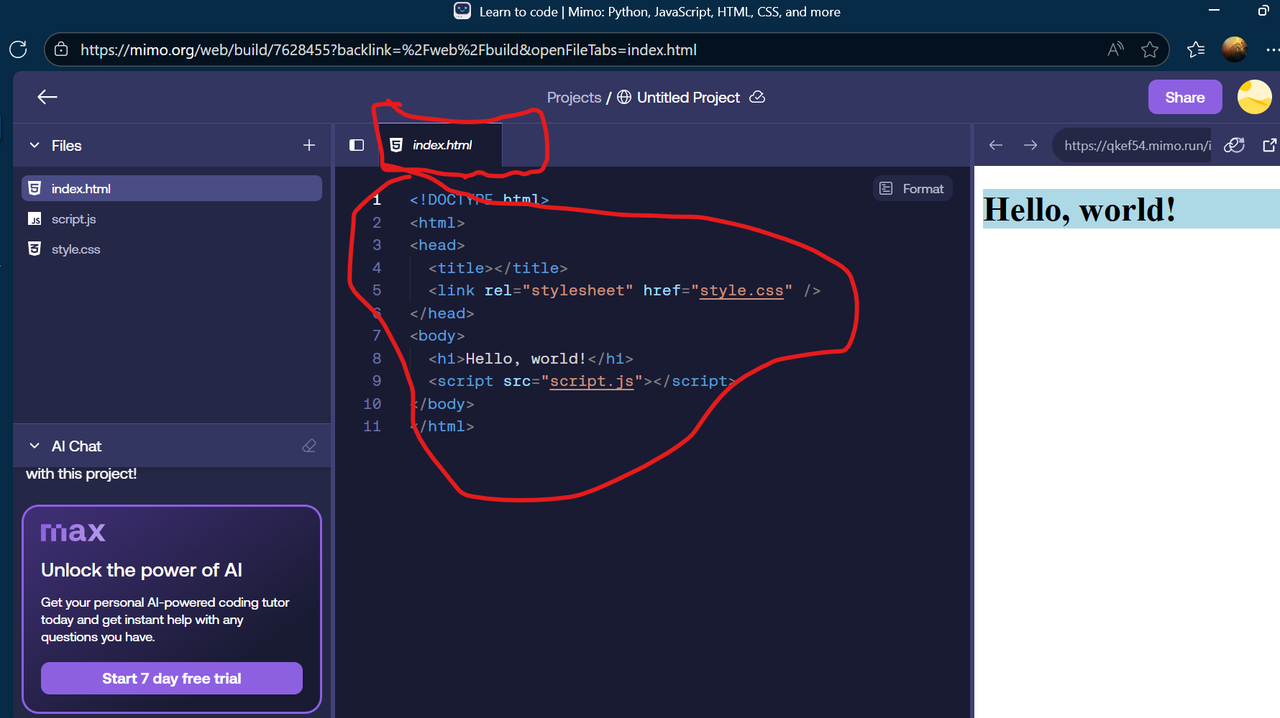
Step 4: Integrate & Test in Mimo
Clear default code, paste AI output, save, and preview. Debug errors in console (F12). Export as ZIP for local tweaks.
!important sparingly.
Quick AI Quiz: Test Your Grasp!
Q1: What's the best initial prompt for a cat site?
Q2: Where to paste AI code?
Method 2: Hands-On Coding Without AI
Build core skills for sustainable development. Focus on HTML5, CSS3 Flexbox/Grid, and vanilla JS.
Step 1: Core Lessons in Mimo
Navigate to Learn: Progress through interactive paths (80% completion unlocks certs).
- HTML: Structure (semantics, forms, media embeds)
- CSS: Layouts (Flex/Grid), responsiveness (media queries), transitions
- JS: Variables, functions, DOM events, async fetches
Step 2: Initialize Blank Project
In Build, select blank Static Website. Pair with free VS Code: Install extensions like Live Server for instant previews.

Step 3: Code & Iterate Features
Start simple: <h1>Cat Central</h1> > Add
<img src="cat.jpg" alt="Fluffy Cat"> > Style with
.hero { display: flex; justify-content: center; }.
- Hero: Background image + overlay text
- Gallery: CSS Grid with hover zooms
- Interactive: JS button for random cat facts
@media (max-width: 768px) { .grid { grid-template-columns: 1fr; }
            }
for mobile magic.
Manual Coding Quiz
Q1: Which CSS property for responsive columns?
Q2: JS to add click event?
Method 3: Deploy & Host Live
From free to pro—detailed steps with pitfalls. Static sites shine here (no backend needed).
| Platform | Type | Cost | Domain | Best For |
|---|---|---|---|---|
| GitHub Pages | Free | $0 Forever | Custom Yes | Git-savvy devs |
| Netlify | Free/Pro | $0–$19/mo | Custom + SSL | Forms & CI/CD |
| IONOS | Cloud Paid | €1/mo Up | EU Domains | High Traffic |
| Namecheap | Shared Paid | $1.98/mo | Bundle Deals | Beginner cPanel |
Free: GitHub Pages Deep Dive
Version control + hosting in one.
- Repo Creation: New Repo > Public > Add README > Create.
-
File Upload: Upload index.html/assets > Commit
changes. CLI:
git init; git remote add origin [url]; git push -u origin
              main
. - Pages Activation: Settings > Pages > Branch: main > / (root) > Save. Wait 2–5 mins for build.
- Domain Setup: Buy at Namecheap > DNS: A records to GitHub IPs (185.199.108.153 etc.) + CNAME www to username.github.io.
- Advanced: Jekyll for blogs—add _config.yml.
Free: Netlify Drag-Drop Mastery
Zero-config deploys with previews.
- Account: Sign Up via GitHub.
- Deploy: New Site > Drag folder > Deploy. Or Git connect for auto-pulls.
- URL: Edit site name (e.g., cats-netlify.netlify.app) > Forms tab for contact handling.
- Custom Domain: Site Settings > Domain > Add > Verify DNS (TXT record).
- Pro Tip: Netlify Functions for light backend (free tier: 125k calls/mo).
Paid: IONOS Cloud Hosting
Scalable S3-compatible storage.
- Plan: Object Storage > €1/100GB/mo.
- Bucket: Dashboard > Create > Enable public read.
-
Upload: Console or CLI: Install IONOS CLI,
ionosctl storage bucket upload-files. - Website Mode: Bucket > Static Hosting > Index: index.html > Endpoint URL.
- DNS: Route53-like: CNAME to bucket endpoint + HTTPS cert.
Paid: Namecheap Shared Hosting
Easy GUI for uploads.
- Buy: Stellar Plan + .com domain ($8.88/yr bundle).
- cPanel: Email welcome > Login > File Manager > public_html.
- Upload: Drag-drop or FTP (host: server.namecheaphosting.com, port 21).
- Domain: Advanced DNS > Custom nameservers if needed.
- SSL/Security: AutoSSL free; add Cloudflare for CDN.
Hosting Quiz Challenge
Q1: Free platform with Git integration?
Q2: Drag-drop deploy tool?
Masterclass Quizzes Hub
Reinforce learning! Complete all for a "Web Wizard" badge (tracked in localStorage). Avg score: 80%+ unlocks motivation confetti.
Jump back: AI Quiz | Manual Quiz | Hosting Quiz
Unleash Your Creation!
Built a cat empire, game, or portfolio? Email benfree11@icloud.com—get featured on benswebsite.click to 10k+ viewers!
Share code, screenshots, or live links. Community spotlights inspire all.
Advanced Next Steps
Now conquer: React/Vue for SPAs, Tailwind for rapid CSS, Vercel for edge deploys. Track progress with a personal roadmap.
- Tailwind Guide
- React Tutorial
- Challenge: Fork this page on GitHub, add your twist, PR to me!